Flume 学习笔记
概述
Flume 是一种分布式、可靠且可用的服务,用于高效收集、聚合和移动大量日志数据。它具有基于流数据流的简单灵活的架构。它具有可调整的可靠性机制以及许多故障转移和恢复机制,具有健壮性和容错性。它使用简单可扩展数据模型允许在线分析应用程序。
实时读取服务器上的日志数据,将数据写入到HDFS
Flume的优点
可以和任意存储进程集成
输入的数据速率大于写入目的的存储速率,Flume会进行缓冲,减小hdfs的压力
flume中在channel上支持事务,使用了两个事务模型(sender + reciever),确保消息可靠发送
source->channel 和channel->sink ,只有事务中的所有的数据全部提交到channel,那么source才认为数据读取完成,同理,只有所有数据都别写出sink,才会从channel中移除
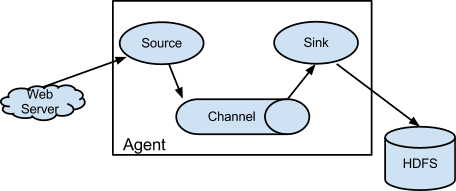
Flume的架构
Source 数据输入端的类型:
Avro Source
Thrift Source
Exec Source
JMS Source
JMS message converter
SSL and JMS Source
Spooling Directory Source
Event Deserializers
LINE
AVRO
BlobDeserializer
Taildir Source
Twitter 1% firehose Source (experimental)
Kafka Source
NetCat TCP Source
NetCat UDP Source
Sequence Generator Source
Syslog Sources
Syslog TCP Source
Multiport Syslog TCP Source
Syslog UDP Source
HTTP Source
JSONHandler
BlobHandler
Stress Source
Legacy Sources
Avro Legacy Source
Thrift Legacy Source
Custom Source
Scribe Source
Sink 目的地的类型:
HDFS Sink
Hive Sink
Logger Sink
Avro Sink
Thrift Sink
IRC Sink
File Roll Sink
Null Sink
HBaseSinks
HBaseSink
HBase2Sink
AsyncHBaseSink
MorphlineSolrSink
ElasticSearchSink
Kite Dataset Sink
Kafka Sink
HTTP Sink
Custom Sink
Channel 是source sink之间的缓冲,类型有:
Memory Channel : 基于内存的,你不关心日志是否丢失
JDBC Channel
Kafka Channel
File Channel :保证数据不丢失,写入channel的数据会被持久化
Spillable Memory Channel
Pseudo Transaction Channel
Custom Channel
安装部署
下载地址
1
https://flume.apache.org/download.html上传到/opt/software下
解压缩,记得切换到hadoop用户
1
tar -xzvf apache-flume-1.9.0-bin.tar.gz -C /opt/module/做软连接
1
ln -s apache-flume-1.9.0-bin flume移除有冲突的jar包
将guava-11.0.2.jar包移除,或者改名也行
因为和hadoop下的冲突
/opt/module/hadoop/share/hadoop/common/lib/guava-27.0-jre.jar
可以把上面的新的cp过来
1
cp /opt/module/hadoop/share/hadoop/common/lib/guava-27.0-jre.jar /opt/module/flume/lib/
案例一: 监控本地端口
NetCat TCP
使用Flume监听一个端口,收集这个端口的数据,打印到控制台,或者输出到文件
下载安装netcat
1
sudo yum install -y nc配置flume的配置文件
1
2
mkdir jobs
vi flume-nc.conf1
2
3
4
5
6
7
8
9
10
11
12
13
14
15
16
17
18
19
20
21
22
23
24
25
26
27
28
29
30
31
32
33
34
35
36
37
38# Name the components on this agent
# a1 是agent的名字,随便起,后面启动flume的时候要对应这个名字
# r1 是source的名字
a1.sources = r1
# k1是sink的名字
a1.sinks = k1
# c1是channel的名字
a1.channels = c1
# Describe/configure the source
# 配置source
# r1的类型是netcat
a1.sources.r1.type = netcat
# 绑定的ip地址是localhost
a1.sources.r1.bind = localhost
# 绑定的端口是44444
a1.sources.r1.port = 44444
# Describe the sink
# 配置 sink
# sink的类型是日志类型
a1.sinks.k1.type = logger
# Use a channel which buffers events in memory
# 配置channel
# c1的类型是memory channel
a1.channels.c1.type = memory
# c1最多能容纳1000个event
a1.channels.c1.capacity = 1000
# c1的事务提交100个提交一次
a1.channels.c1.transactionCapacity = 100
# Bind the source and sink to the channel
# 把 source和sink 跟channel 连接起来
# r1的channel是c1
a1.sources.r1.channels = c1
# k1的channel是c1
a1.sinks.k1.channel = c1检查端口是否被占用
1
2
3sudo netstat -nlp | grep 44444
tcp6 0 0 127.0.0.1:44444 :::* LISTEN 22600/java上面就是44444端口被一个java进程占用,进程id是22600
杀掉进程
1
kill 22600启动flume
1
2
3
4
5
6
7
8
9$ bin/flume-ng agent --conf conf --conf-file jobs/flume-nc.conf --name a1 -Dflume.root.logger=INFO,console
--conf conf 配置文件在什么地方,跟的是个目录
--conf-file flume本次运行的配置文件(source sink channel的配置)
--name agent的名字
-Dflume.root.logger=INFO,console 运行时参数flume.root.logger修改为INFO,console,让日志在控制台输出,输出的级别是INFO,日志级别DEBUG INFO WARN ERROR
简写
bin/flume-ng agent -c conf -n a1 -f jobs/flume-nc.conf启动nc发送数据
打开另外一个远程连接窗口执行
1
nc localhost 44444输入内容
在flume运行的窗口就会收到信息
1
2
3
4[INFO - org.apache.flume.sink.LoggerSink.process(LoggerSink.java:95)] Event: { headers:{} body: 68 65 6C 6C 6F hello }
2022-04-21 22:59:31,374 (SinkRunner-PollingRunner-DefaultSinkProcessor) [INFO - org.apache.flume.sink.LoggerSink.process(LoggerSink.java:95)] Event: { headers:{} body: E4 BD 95 E5 85 B5 E5 AE B6 ......... }
案例二:实时监控单个文件,保存到hdfs中
配置下hdfs
之前的服务器已经配好了/etc/profiled.d/hadoop_env.sh
1
2
3
4
5
6
7
8
9# JAVA_HOME
export JAVA_HOME=/opt/module/jdk1.8.0_202
export PATH=$PATH:$JAVA_HOME/bin
# HADOOP_HOME
export HADOOP_HOME=/opt/module/hadoop
export PATH=$PATH:$HADOOP_HOME/bin
export PATH=$PATH:$HADOOP_HOME/sbin创建flume配置文件
jobs/flume-file-hdfs.conf
1
2
3
4
5
6
7
8
9
10
11
12
13
14
15
16
17
18
19
20
21
22
23
24
25
26
27
28
29
30
31
32
33
34
35
36
37# 命名组件
a1.sources = r1
a1.channels = c1
a1.sinks = k1
# 配置source
# source 一个可执行的命令
a1.sources.r1.type = exec
# 命令是tail -F
a1.sources.r1.command = tail -F /tmp/njust.log
# 配置sink
a1.sinks.k1.type = hdfs
# hdfs的路径 要写全称hdfs://namenode:port/path 路径可以用通配符去生成
a1.sinks.k1.hdfs.path = hdfs://hadoop201:8020/flume/events/%y-%m-%d/%H%M
# 上传文件的前缀
a1.sinks.k1.hdfs.filePrefix = events-
# 是否应该按时间滚动文件夹
a1.sinks.k1.hdfs.round = true
# 10分钟生成一个文件夹
a1.sinks.k1.hdfs.roundValue = 10
# 定义时间单位
a1.sinks.k1.hdfs.roundUnit = minute
# 使用本地时间戳
a1.sinks.k1.hdfs.useLocalTimeStamp = true
# 配置channel
# c1的类型是memory channel
a1.channels.c1.type = memory
# c1最多能容纳1000个event
a1.channels.c1.capacity = 1000
# c1的事务提交100个提交一次
a1.channels.c1.transactionCapacity = 100
# 连接起来
a1.sources.r1.channels = c1
a1.sinks.k1.channel = c1运行
1
$ bin/flume-ng agent -c conf -n a1 -f jobs/flu-file-hdfs.conf往/tmp/njust.log里面加东西
观察hdfs的目录
案例三: 实时监控目录
只监控目录下的新文件,.complete就不管了
配置
1
2
3
4
5
6
7
8
9
10
11
12
13
14
15
16
17
18
19
20
21
22
23
24
25
26
27
28
29
30
31
32
33
34
35
36
37
38
39
40
41
42
43
44
45
46
47
48
49
50# 命名组件
a1.sources = r1
a1.channels = c1
a1.sinks = k1
# 配置source
# source spooldir 监控目录的source
a1.sources.r1.type = spooldir
# 配置监控目录
a1.sources.r1.spoolDir = /tmp/hadoop
# 是否添加文件绝对路径当文件头
a1.sources.r1.fileHeader = true
# 文件上传好以后,会被改名,后缀是什么
a1.sources.r1.fileSuffix = .COMPLETED
# includePattern 可以用正则表达式来配置哪些文件名的文件要上传
# ignorePattern 哪些忽略
# 配置sink
a1.sinks.k1.type = hdfs
# hdfs的路径 要写全称hdfs://namenode:port/path 路径可以用通配符去生成
a1.sinks.k1.hdfs.path = hdfs://hadoop201:8020/flume/events/%y-%m-%d/%H%M
# 上传文件的前缀
a1.sinks.k1.hdfs.filePrefix = events-
# 是否应该按时间滚动文件夹
a1.sinks.k1.hdfs.round = true
# 10分钟生成一个文件夹
a1.sinks.k1.hdfs.roundValue = 10
# 定义时间单位
a1.sinks.k1.hdfs.roundUnit = minute
# 使用本地时间戳
a1.sinks.k1.hdfs.useLocalTimeStamp = true
# 多久生成一个新文件
a1.sinks.k1.hdfs.hdfs.rollInterval = 60
# 一次写100个Event到hdfs
a1.sinks.k1.hdfs.hdfs.hdfs.batchSize = 100
# 配置channel
# c1的类型是memory channel
a1.channels.c1.type = memory
# c1最多能容纳1000个event
a1.channels.c1.capacity = 1000
# c1的事务提交100个提交一次
a1.channels.c1.transactionCapacity = 100
# 连接起来
a1.sources.r1.channels = c1
a1.sinks.k1.channel = c1运行
案例四 实时监控目录下多个文件追加
exec source 是一个文件
Taildir source 适用监听多个追加文件,而且支持断点续传
配置flume-taildir-hdfs.conf
1
2
3
4
5
6
7
8
9
10
11
12
13
14
15
16
17
18
19
20
21
22
23
24
25
26
27
28
29
30
31
32
33
34
35
36
37
38
39
40
41
42
43
44
45
46
47
48
49
50
51
52
53# 命名组件
a1.sources = r1
a1.channels = c1
a1.sinks = k1
# 配置source
# source taildir 监控目录下的多个文件追加
a1.sources.r1.type = TAILDIR
a1.sources.r1.positionFile = /tmp/hadoop/flume/taildir_position.json
# 指示有几个文件组,中间用空格分开
a1.sources.r1.filegroups = f1 f2
# 定义f1文件组的文件,可以是单个文件
a1.sources.r1.filegroups.f1 = /tmp/hadoop/test1/example.log
a1.sources.r1.headers.f1.headerKey1 = value1
a1.sources.r1.filegroups.f2 = /tmp/hadoop/test2/.*log.*
a1.sources.r1.headers.f2.headerKey1 = value2
a1.sources.r1.headers.f2.headerKey2 = value2-2
# 日志里面用文件的绝对路径做头
a1.sources.r1.fileHeader = true
a1.sources.ri.maxBatchCount = 1000
# 配置sink
a1.sinks.k1.type = hdfs
# hdfs的路径 要写全称hdfs://namenode:port/path 路径可以用通配符去生成
a1.sinks.k1.hdfs.path = hdfs://hadoop201:8020/flume/events/%y-%m-%d/%H%M
# 上传文件的前缀
a1.sinks.k1.hdfs.filePrefix = events-
# 是否应该按时间滚动文件夹
a1.sinks.k1.hdfs.round = true
# 10分钟生成一个文件夹
a1.sinks.k1.hdfs.roundValue = 10
# 定义时间单位
a1.sinks.k1.hdfs.roundUnit = minute
# 使用本地时间戳
a1.sinks.k1.hdfs.useLocalTimeStamp = true
# 多久生成一个新文件
a1.sinks.k1.hdfs.hdfs.rollInterval = 60
# 一次写100个Event到hdfs
a1.sinks.k1.hdfs.hdfs.hdfs.batchSize = 100
# 配置channel
# c1的类型是memory channel
a1.channels.c1.type = memory
# c1最多能容纳1000个event
a1.channels.c1.capacity = 1000
# c1的事务提交100个提交一次
a1.channels.c1.transactionCapacity = 100
# 连接起来
a1.sources.r1.channels = c1
a1.sinks.k1.channel = c1
Flume 事务
Flume agent中间有三个组件,source channel sink,里面流的东西是event ,event由head和body组成
事务分两个部分
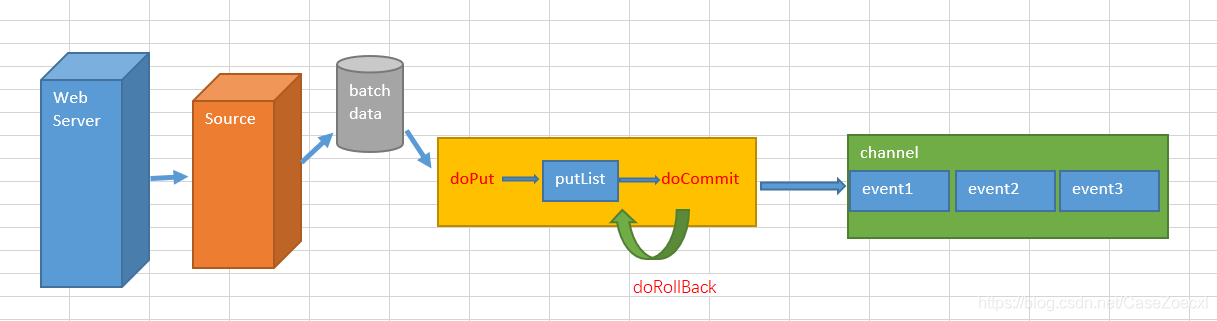
put事务
source -> channel的部分
首先Source会采集一批数据,封装为event,缓存达到batch data的最大容量时(batch data的大小取决于配置参数batch size的值),Flume开启事务:
doPut():将这批event写入到临时缓冲区putList,putList是一个LinkedBlockingDeque
,大小取决于配置Channel的参数transaction capacity的大小。
doCommit():检查channel内存队列是否足够合并,内存队列的大小由Channel的capacity参数控制, Channel的容量内存队列足够的时候,提交event成功。
doRollback(): channel内存队列空间不够时,回滚,这里会将整个putList中的数据都扔掉,然后给Source返回一个ChannelException异常,告诉Source数据没有采集上。Source会重新采集这批数据,然后开启新的事务。
Take事务
channel -> sink
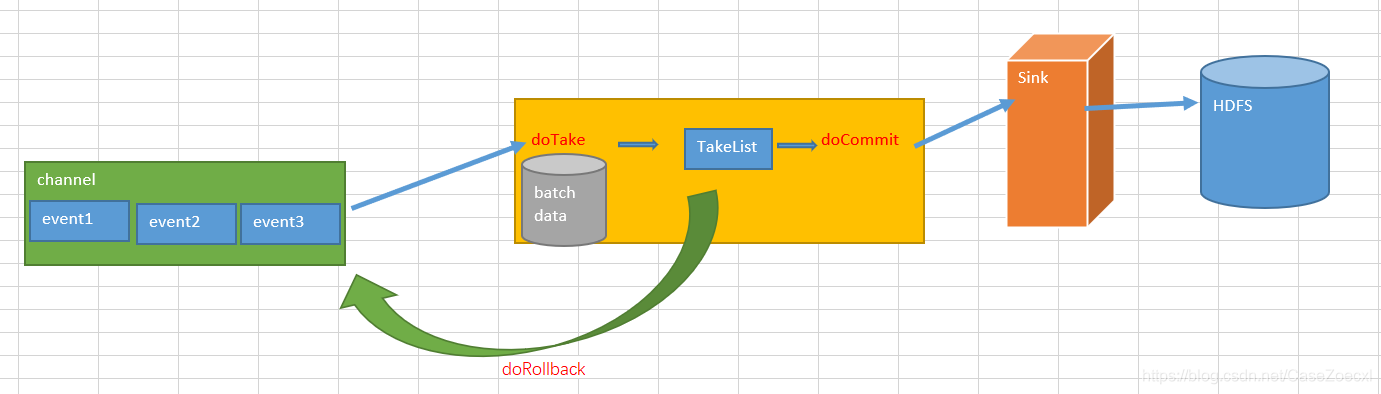
doTake():sink将数据剪切取到临时缓冲区takeList,takeList也是一个LinkedBlockingDeque,
大小取决于配置Channel的参数transaction capacity的大小,同时也拷贝一份放入写往HDFS的IO流中。
doCommit():如果event全部发送成功,就清除takeList。
doRollback():如果发送过程中出现异常,回滚,将takeList中的全部event归还给Channel。这个操作可能导致数据重复,如果已经写入一半的event到了HDFS,但是回滚时会向channel归还整个takeList中的event,后续再次开启事务向HDFS写入这批event时候,就出现了数据重复。
Flume的事务仅能保证两个传输阶段的数据不丢,但是如果channel选用的是memory channel,那么由于memory channel将数据存储在内存中,一旦channel发生异常,数据仍然可能丢失,但采用File channel时,数据传输到channel时会落盘,再结合事务,会保证整体上数据不会丢失,但是仍然可能会在take事务阶段发生数据重复。
Flume 重要组件
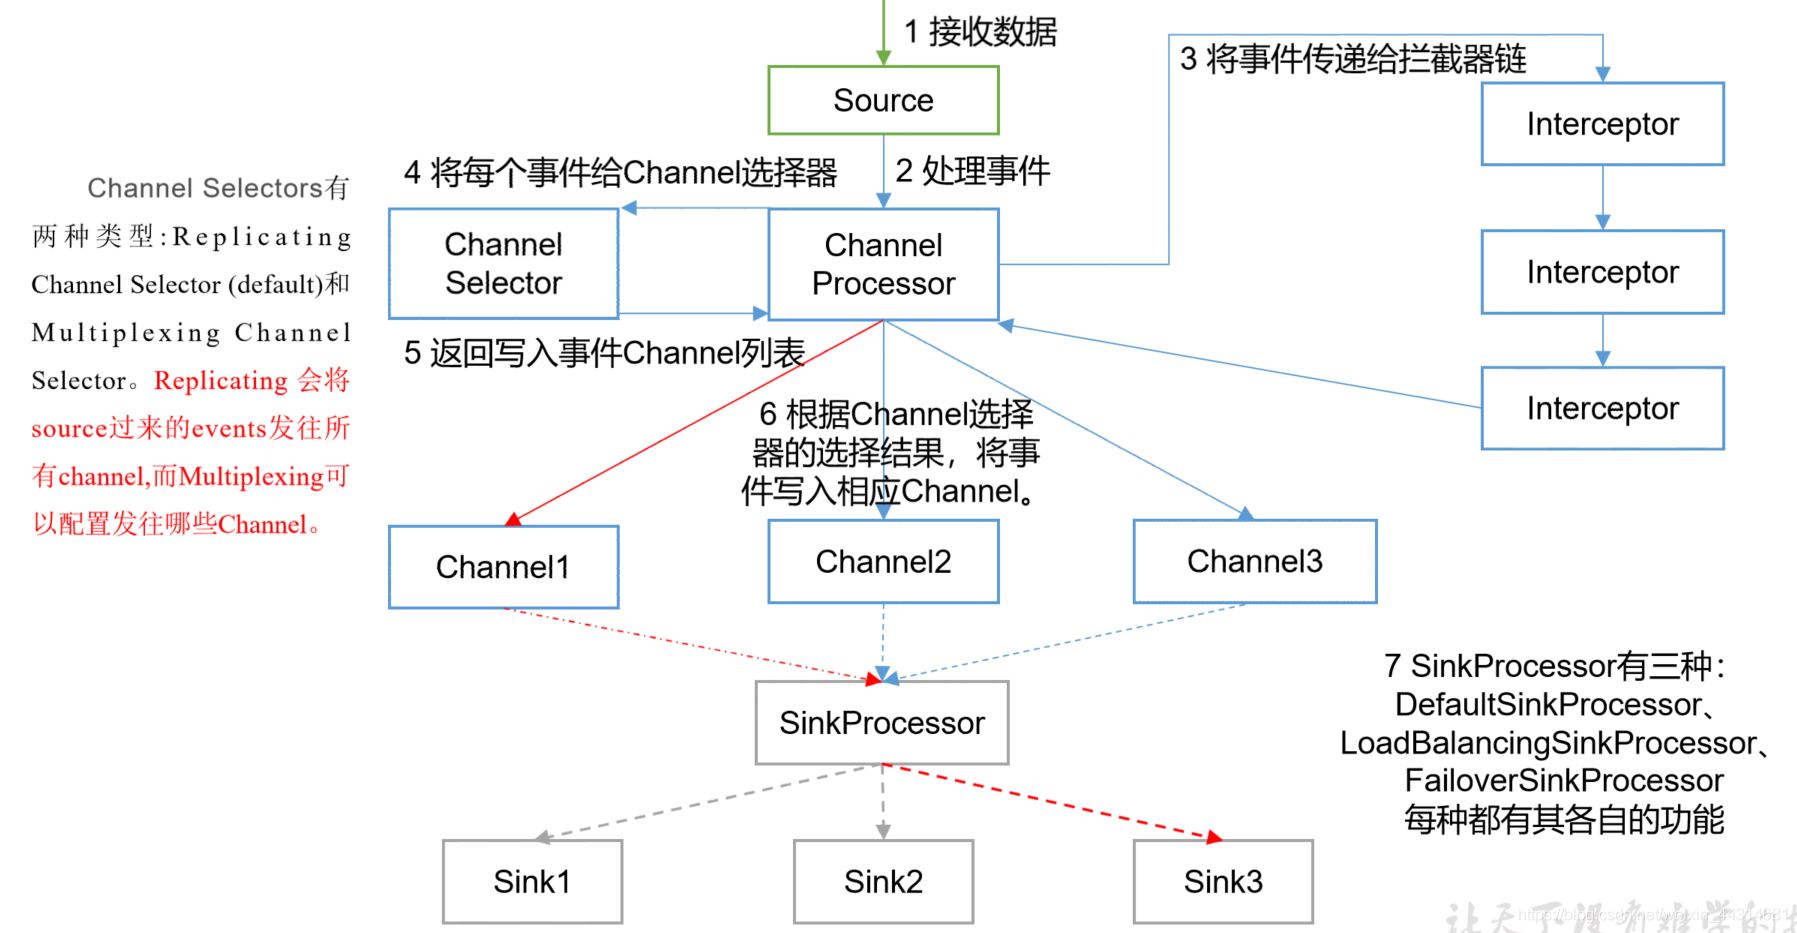
Flume Channel Selectors ( 3 种 )
作用就是选出event该去哪个channel,默认就是replicating(复制)
Replicating Channel Selector
1
2
3
4
5
6
7
8a1.sources = r1
a1.channels = c1 c2 c3
# 定义channel的选择器是复制, 将source来的一个event c1 c2 c3都复制发一份
a1.sources.r1.selector.type = replicating
# 定义了3个channel
a1.sources.r1.channels = c1 c2 c3
# c3如果数据出问题,不管,c1 c2没配置,则必须执行事务
a1.sources.r1.selector.optional = c3Multiplexing Channel Selector
会将event根据条件发到不同的channel
1
2
3
4
5
6
7a1.sources = r1
a1.channels = c1 c2 c3 c4
a1.sources.r1.selector.type = multiplexing
a1.sources.r1.selector.header = state
a1.sources.r1.selector.mapping.CZ = c1
a1.sources.r1.selector.mapping.US = c2 c3
a1.sources.r1.selector.default = c4
Custom Channel Selector 自定义的
implementation of the ChannelSelector interface
Flume Sink Processors
Default Sink Processor:对应单个sink
Failover Sink Processor: 维护一个有优先级的水池列表,确保 event一定会被处理(送达),失败的会处理
1
2
3
4
5
6
7a1.sinkgroups = g1
a1.sinkgroups.g1.sinks = k1 k2
a1.sinkgroups.g1.processor.type = failover
# 必配 sink优先级,数字越大优先级越高
a1.sinkgroups.g1.processor.priority.k1 = 5
a1.sinkgroups.g1.processor.priority.k2 = 10
a1.sinkgroups.g1.processor.maxpenalty = 10000Load balancing Sink Processor:实现负载均衡sinks
1
2
3
4
5a1.sinkgroups = g1
a1.sinkgroups.g1.sinks = k1 k2
a1.sinkgroups.g1.processor.type = load_balance
a1.sinkgroups.g1.processor.backoff = true
a1.sinkgroups.g1.processor.selector = randomFlume Interceptors
flume在执行中有能力去修改和丢弃event,Interceptors拦截器就是做这个的
Flume的拓扑结构
串联

将多个flume按顺序连接起来,不建议串联太长,因为如果中间一个出问题,整个通道就都完了
- Consolidation 合并
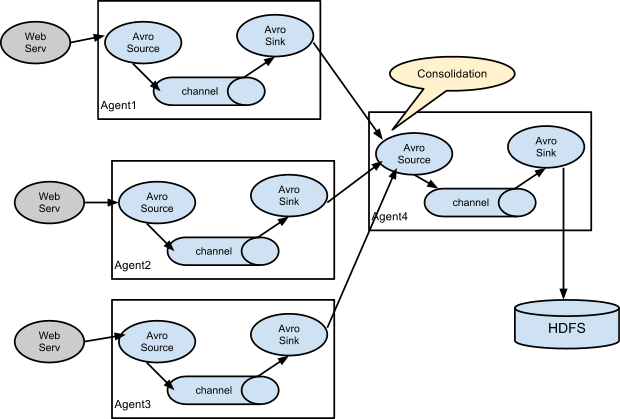
大多数情况用这种,工作环境,服务器会非常多,将多个服务器的数据采集汇总,给每台服务器配一个flume,然后传送到一个统一的sink去汇总处理,日志分析
- Multiplexing the flow 多路复用
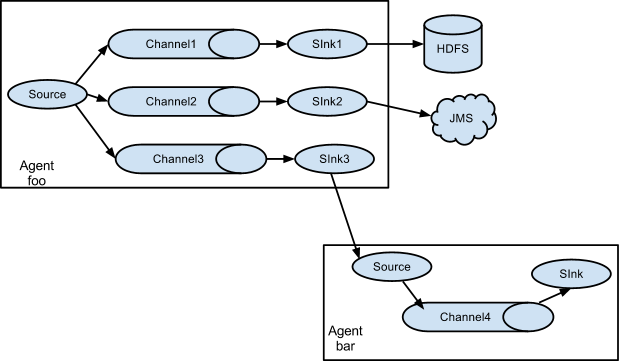
支持将source分发到不同的channel,多个目的地
Load-Balance负载均衡和Failover 故障切换
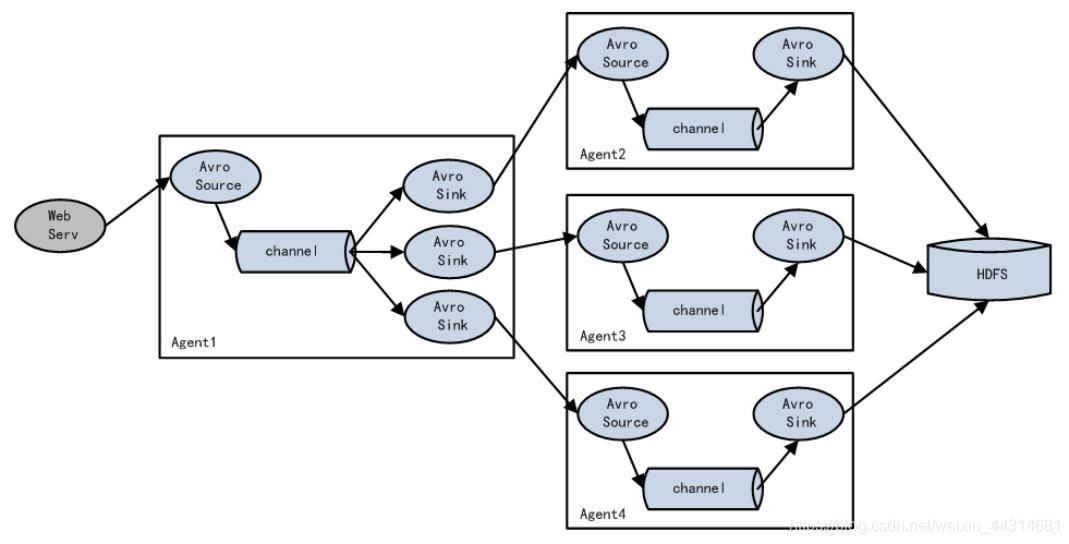
将多个sink 组成一个组,sink组实现负载均衡和故障切换
案例五 多路
有一个FlumeA监控文件,会把变动发到FlumeB,FlumeB负责写入hdfs,FlumeA还会发送给FlumeC,FlumeC就直接输出到本地console或者文件
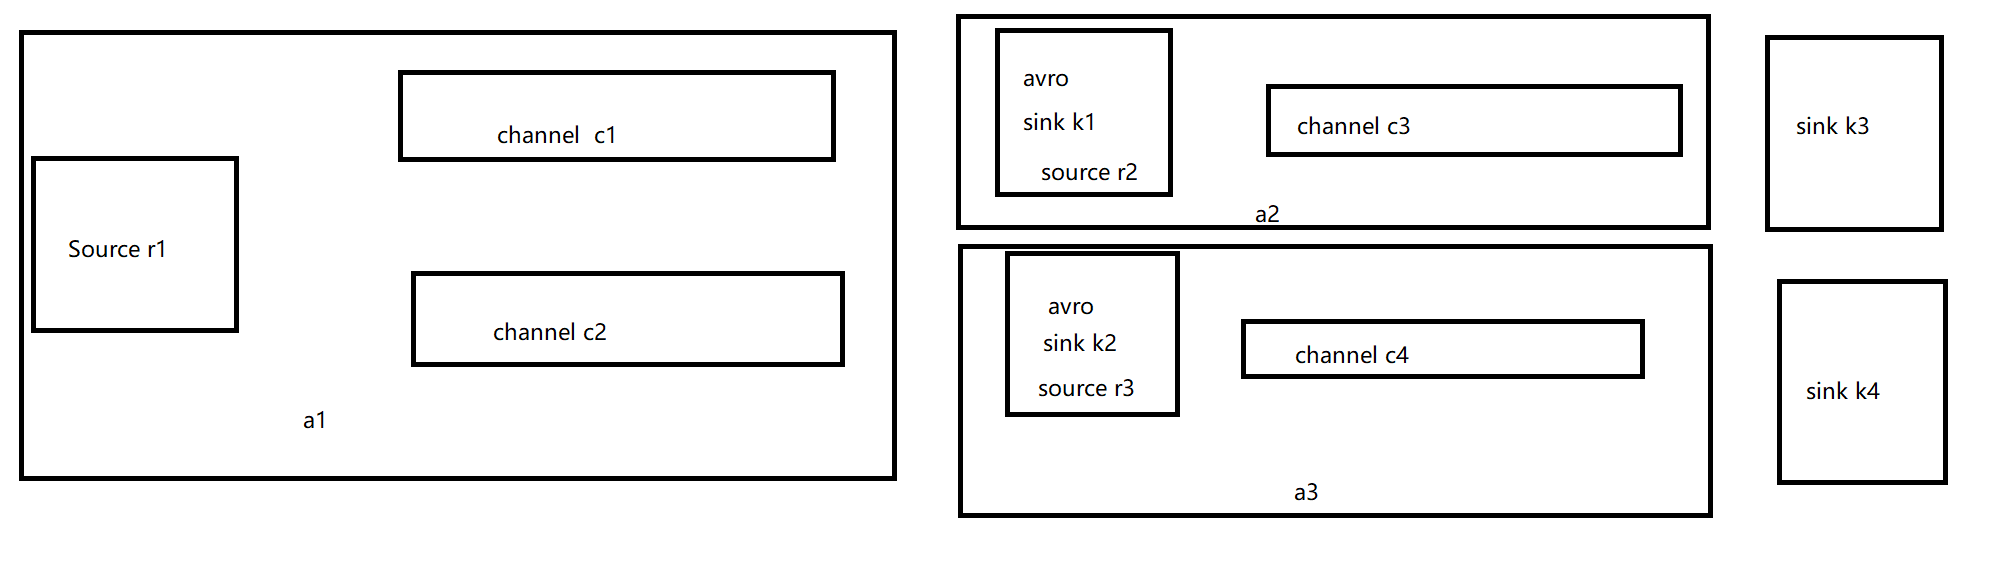
配置文件 flume-file-flume.conf 用来将日志的内容发送到2个channel,两个sink
1
2
3
4
5
6
7
8
9
10
11
12
13
14
15
16
17
18
19
20
21
22
23
24
25
26
27
28
29
30
31
32
33
34
35
36
37
38
39
40# 命名组件
a1.sources = r1
a1.channels = c1 c2
a1.sinks = k1 k2
# 配置 source
# 配置 selector
a1.sources.r1.selector.type = replicating
a1.sources.r1.type = exec
a1.sources.r1.command = tail -F /tmp/njust.log
a1.sources.r1.shell = /bin/bash -c
# 配置sink k1
a1.sinks.k1.type = avro
a1.sinks.k1.hostname = hadoop201
a1.sinks.k1.port = 4545
# 配置sink k2
a1.sinks.k2.type = avro
a1.sinks.k2.hostname = hadoop201
a1.sinks.k2.port = 4646
# 配置channel
# c1的类型是memory channel
a1.channels.c1.type = memory
# c1最多能容纳1000个event
a1.channels.c1.capacity = 1000
# c1的事务提交100个提交一次
a1.channels.c1.transactionCapacity = 100
# c2的类型是memory channel
a1.channels.c2.type = memory
# c2最多能容纳1000个event
a1.channels.c2.capacity = 1000
# c2的事务提交100个提交一次
a1.channels.c2.transactionCapacity = 100
# 连接起来
a1.sources.r1.channels = c1 c2
a1.sinks.k1.channel = c1
a1.sinks.k2.channel = c2配置文件 flume-flume-hdfs.conf 从flume到hdfs
1
2
3
4
5
6
7
8
9
10
11
12
13
14
15
16
17
18
19
20
21
22
23
24
25
26
27
28
29
30
31
32
33
34
35
36
37
38# 命名组件
a2.sources = r2
a2.channels = c3
a2.sinks = k3
# 配置source
# source 一个可执行的命令
a2.sources.r2.type = avro
a2.sources.r2.bind = hadoop201
a2.sources.r2.port = 4545
# 配置sink
a2.sinks.k3.type = hdfs
# hdfs的路径 要写全称hdfs://namenode:port/path 路径可以用通配符去生成
a2.sinks.k3.hdfs.path = hdfs://hadoop201:8020/flume/events2/%y-%m-%d/%H%M
# 上传文件的前缀
a2.sinks.k3.hdfs.filePrefix = events-
# 是否应该按时间滚动文件夹
a2.sinks.k3.hdfs.round = true
# 10分钟生成一个文件夹
a2.sinks.k3.hdfs.roundValue = 10
# 定义时间单位
a2.sinks.k3.hdfs.roundUnit = minute
# 使用本地时间戳
a2.sinks.k3.hdfs.useLocalTimeStamp = true
# 配置channel
# c3的类型是memory channel
a2.channels.c3.type = memory
# c3最多能容纳1000个event
a2.channels.c3.capacity = 1000
# c3的事务提交100个提交一次
a2.channels.c3.transactionCapacity = 100
# 连接起来
a2.sources.r2.channels = c3
a2.sinks.k3.channel = c3配置文件 flume-flume-local.conf 从flume到本地
1
2
3
4
5
6
7
8
9
10
11
12
13
14
15
16
17
18
19
20
21
22
23
24
25
26
27# 命名组件
a3.sources = r3
a3.channels = c4
a3.sinks = k4
# 配置source
# source 一个可执行的命令
a3.sources.r3.type = avro
a3.sources.r3.bind = hadoop201
a3.sources.r3.port = 4646
# 配置sink file roll sink
a3.sinks.k4.type = file_roll
# 不会自动建目录,请一定要提前建好目录
a3.sinks.k4.sink.directory = /tmp/hadoop/flume/logs
# 配置channel
# c4的类型是memory channel
a3.channels.c4.type = memory
# c4最多能容纳1000个event
a3.channels.c4.capacity = 1000
# c4的事务提交100个提交一次
a3.channels.c4.transactionCapacity = 100
# 连接起来
a3.sources.r3.channels = c4
a3.sinks.k4.channel = c4
案例六 合并
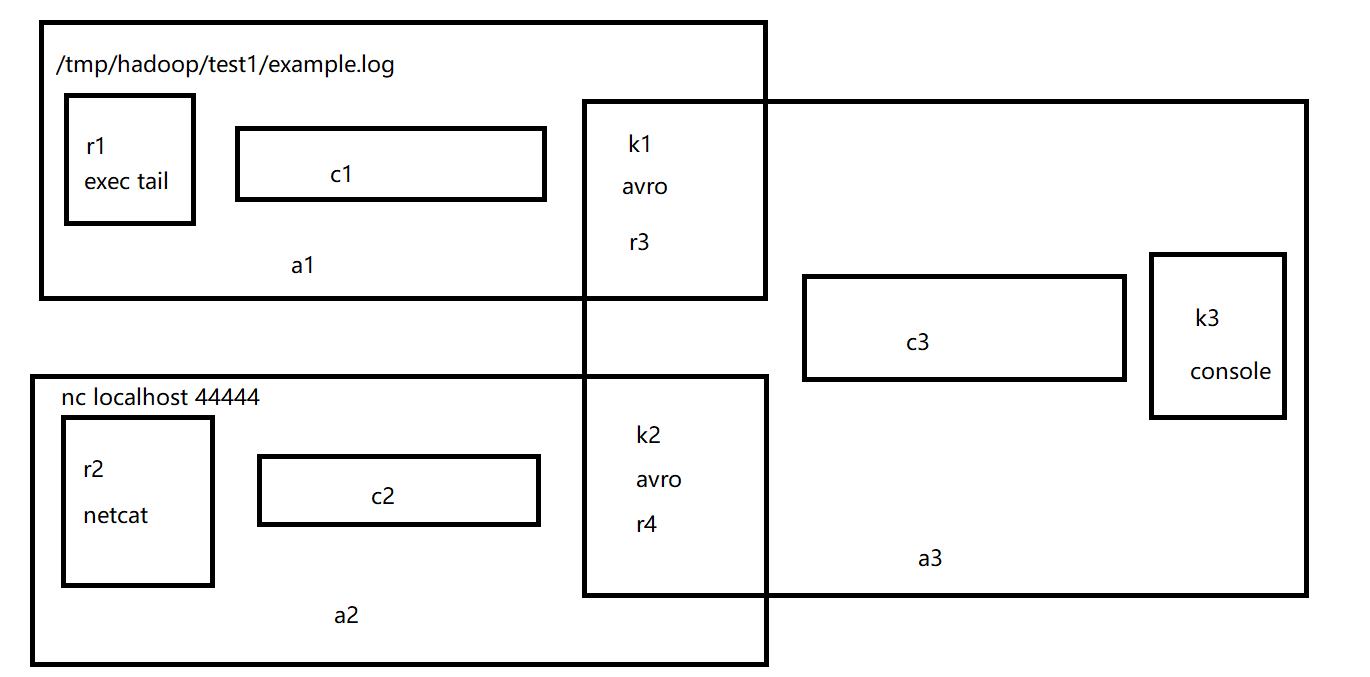
配置a1 flume-file-avro.conf
1
2
3
4
5
6
7
8
9
10
11
12
13
14
15
16
17
18
19
20
21
22
23
24
25
26# 命名组件
a1.sources = r1
a1.channels = c1
a1.sinks = k1
# 配置 source
a1.sources.r1.type = exec
a1.sources.r1.command = tail -F /tmp/hadoop/test1/example.log
a1.sources.r1.shell = /bin/bash -c
# 配置sink k1
a1.sinks.k1.type = avro
a1.sinks.k1.hostname = hadoop203
a1.sinks.k1.port = 4545
# 配置channel
# c1的类型是memory channel
a1.channels.c1.type = memory
# c1最多能容纳1000个event
a1.channels.c1.capacity = 1000
# c1的事务提交100个提交一次
a1.channels.c1.transactionCapacity = 100
# 连接起来
a1.sources.r1.channels = c1
a1.sinks.k1.channel = c1配置a2 flume-nc-avro.conf
1
2
3
4
5
6
7
8
9
10
11
12
13
14
15
16
17
18
19
20
21
22
23
24
25
26
27
28
29# 命名组件
a2.sources = r2
a2.channels = c2
a2.sinks = k2
# 配置 source
# r2的类型是netcat
a2.sources.r2.type = netcat
# 绑定的ip地址是localhost
a2.sources.r2.bind = hadoop202
# 绑定的端口是44444
a2.sources.r2.port = 44444
# 配置sink k2
a2.sinks.k2.type = avro
a2.sinks.k2.hostname = hadoop203
a2.sinks.k2.port = 4545
# 配置channel
# c2的类型是memory channel
a2.channels.c2.type = memory
# c1最多能容纳1000个event
a2.channels.c2.capacity = 1000
# c1的事务提交100个提交一次
a2.channels.c2.transactionCapacity = 100
# 连接起来
a2.sources.r2.channels = c2
a2.sinks.k2.channel = c2配置a3 flume-avro-logger.conf
1
2
3
4
5
6
7
8
9
10
11
12
13
14
15
16
17
18
19
20
21
22
23
24
25# 命名组件
a3.sources = r3
a3.channels = c3
a3.sinks = k3
# 配置source
# source 一个可执行的命令
a3.sources.r3.type = avro
a3.sources.r3.bind = hadoop203
a3.sources.r3.port = 4545
# 配置sink logger
a3.sinks.k3.type = logger
# 配置channel
# c3的类型是memory channel
a3.channels.c3.type = memory
# c3最多能容纳1000个event
a3.channels.c3.capacity = 1000
# c3的事务提交100个提交一次
a3.channels.c3.transactionCapacity = 100
# 连接起来
a3.sources.r3.channels = c3
a3.sinks.k3.channel = c3
自定义
有时不能满足实际需求,需要自定义Source和Sink
案例一:自定义Source
输出自定义的内容,然后在控制台用logger输出
1 | |
idea如何打包
- 先build module
- 在 project structure中添加一个artifact,配置为jar add–>from modules with dependency
- 在右侧output layer中删除所有的dependency,保留Compile output的那个jar包
在项目的out目录下找到打好的jar包
上传到flume下的lib目录下
修改jar包的权限sodu chown hadoop:hadoop FlumeDemo.jar
配置jobs文件
1 | |
运行
1 | |
案例二:自定义Sink
Sink一定要启动事务,从channel中拿取events,然后写入文件或者hdfs…
自定义一个Sink,监听netcat内容,加上前后缀,输出到Logger
1 | |
1 | |
运行
1 | |